illustrate
Products            Buy            Support Forum            Registrations            About           
 

dBpoweramp Music Converter        { Help Index   >   CD Ripper   >  Advanced Options }

Option Button

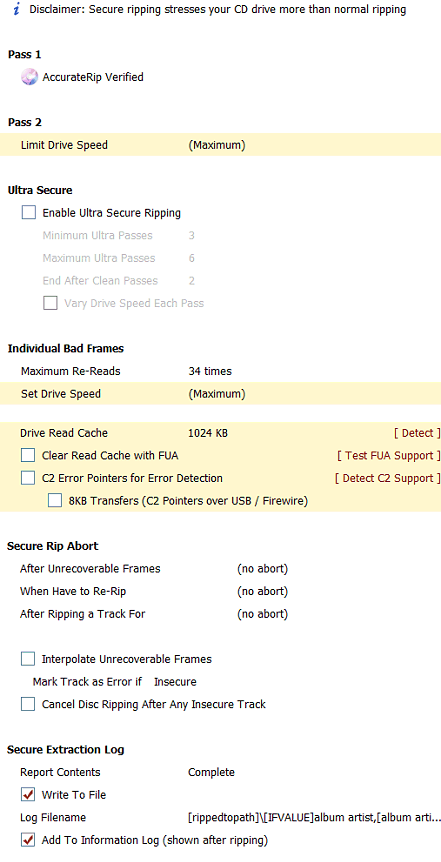
Found on the toolbar at the top of CD Ripper:


Review Metadata

Displays the PerfectMeta review page, this gives an overview of how the metadata was sourced and allows a single provider to override the current metadata, by clicking the button at the top.

Also clicking on a single item shown will use that item, such as track name from a provider.

Many find entering the metadata on this review page to be quicker than the main page also.


Retrieve Metadata From

This option lists all the metadata providers, a read from said provider can be manually requested.


Active Providers

Each Metadata provider with a tick mark is used, it is best to keep the default with 5 providers, which allows PerfectMeta to work which blends the providers together removing errors.

A $20 USB bar code scanner can be used with the Bar Code option, which will for each disc request the barcode is scanned. This increases accuracy of metadata retrieval.


Manual Metadata Search

For new or obscure CDs which my not have metadata present in the on line databases there exists a manual search option:

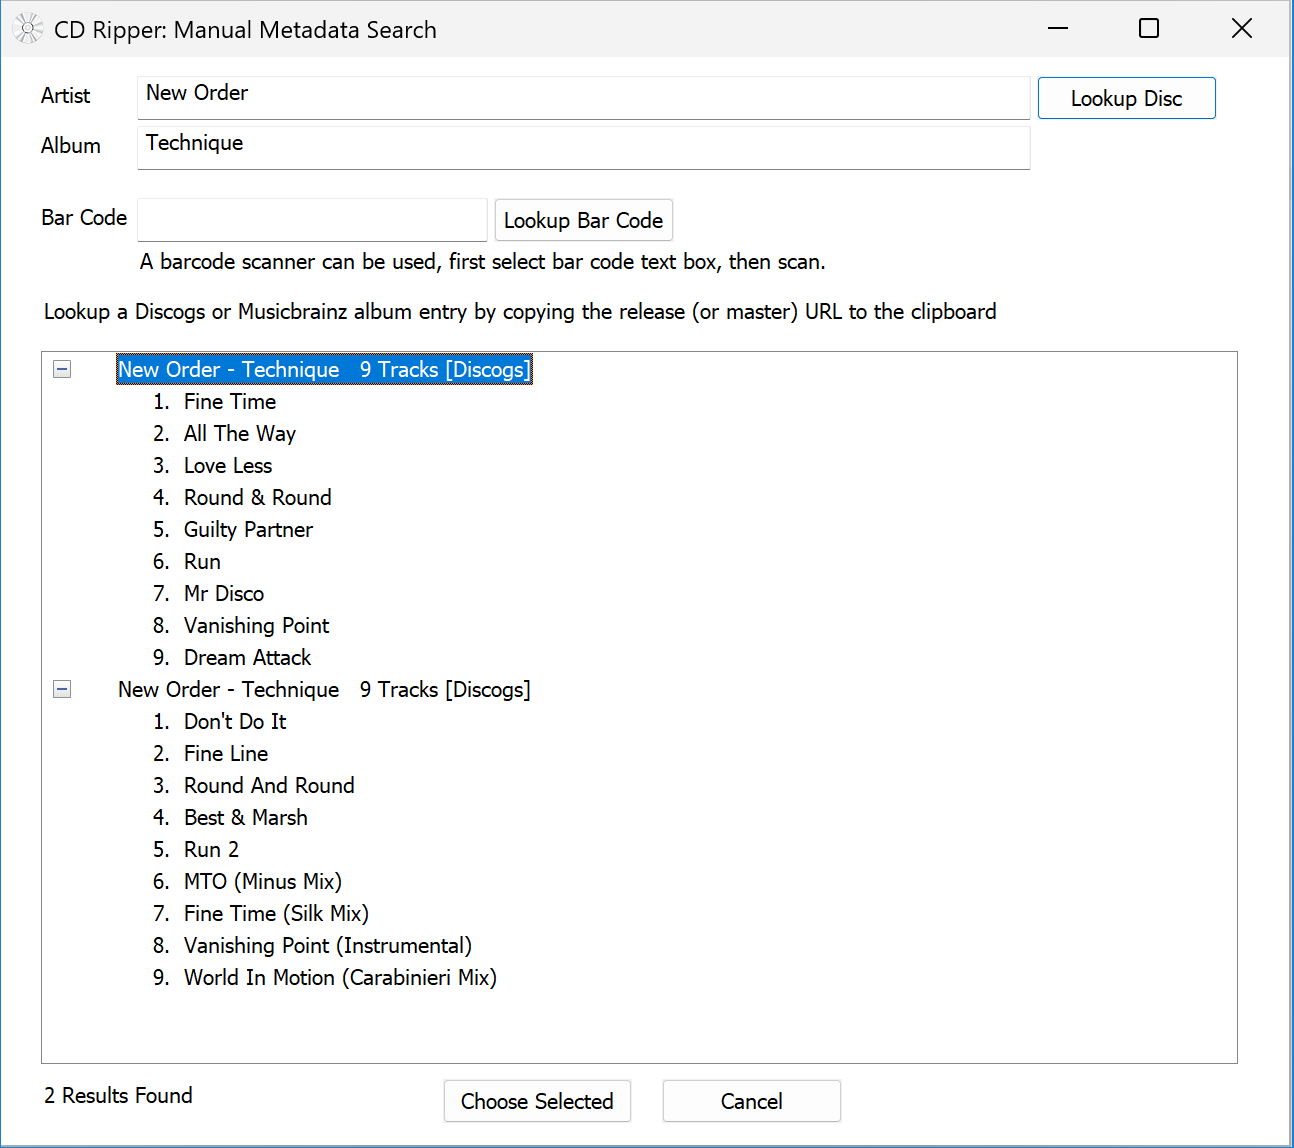
Artist and Album can be typed to be searched, using both Discogs and Musicbrainz. It is also possible to load an exact disc from either of these sites, simply browse to the disc release page on https://www.discogs.com/ or https://musicbrainz.org and copy the URL from the internet browser address bar to the clipboard, if the manual page is showing it will automatically load into CD ripper. To test this, open the Manual Metadata Search page and copy this New Order - Technique URL to clipboard.

Another option is to type the barcode or scan with a bar code scanner the barcode on the back of a CD (a USB bar code scanner costing about $20), then lookup a disc with that.


Encoder Priority

Can be set to a lower priority, thus allowing another task to commence (such as word processing) without as much disturbance. A high priority option is not provided as this would inhibit CD reading.


After Ripping

Various logs can be shown, normally just an error log is show if there were errors. When following the CD Ripper Secure Setup Guide, details enabling a information log, which is useful in determining secure ripping status.

Also is an option to shutdown the computer after the ripping has completed.


Rip as One

Rip as One can join tracks together, or rip the whole disc as a single file. However if doing the latter instead see the cue sheet encoder. To operate rip as one:


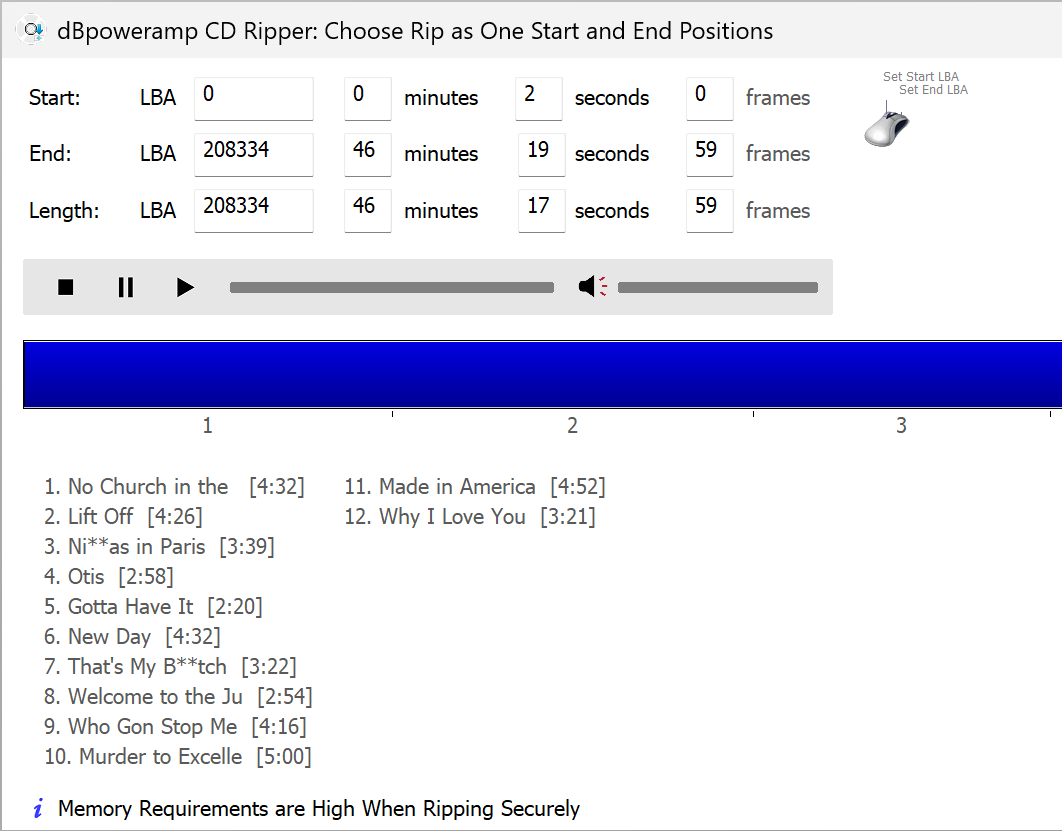
Click the left mouse button on the blue line to set the ripping start position, right mouse sets the ripping end position.

A final note if using Rip as One to rip the whole CD as one image, with secure mode on - the memory requirements are ~600MB x number of passes, so if 2 passes are done that is 1.2GB of memory required in secure mode. Burst mode has no such memory requirements.

CD Ripper Options

Access CD Ripper Options through the green option button >> CD Ripper Options.


Ripping Method

Burst ripping uses no error correction, similar how iTunes or Windows Media Player rip.

Secure is able to detect and recover errors, see CD Ripper Secure Setup Guide.

Defective by Design emulates a standard CD player, reading a last TOC. It can be useful for discs which have a false TOC designed to stop computers ripping. Only enable on problematic CDs and disable for normal discs.


AccurateRip

AccurateRip is an online database containing results of other peoples rips, AccurateRip can verify your rip against the database, ensuring 100% if a rip was without error.

Before AccurateRip can be used the Drive Offset must be detected (macOS auto-sets the offset based on the database). This is an automatic process, a message will appear offering to find the offset on inserting a suitable CD).

Cross-Pressing Verification can match against CDs which are different pressings, that is your matching CD but made in a new batch with a unique new pressing-offset.

Once a month your ripping results will be submitted to the database.

AccurateRip Meta is populated by users, this option sends any new discs to the database.


Tags & Filenames


Meta Data & ID Tag


Maximum Album Art Pixel / File Size sets the maximum allowed art size, anything above this value is scaled down.

Write to writes a Folder.jpg file, this can be used by Windows to replace the folder icon, or by programs.


PerfectMeta Options


Disable Tag Writing disables all ID Tags.

Multi-CD Add Disc to Album option to add disc number to the album ID Tag when the disc is part of a multi-CD collection (box set).

Lead Artist to First Position scans all artists on a disc, sometimes a track has multiple artists, the artist present on all tracks, is set to the main (first artist).

Set Track Artist to Artist with > 70% of Track Coverage is useful for CDs where the artist is not consistent across all the tracks, ie one or two tracks have a different artist, where the CD is clearly not a compilation CD.

Detect 'xxx, yyy' in Artist and Swap to 'yyy xxx', sometimes the artist is stored as Last Name, First Name. This option will detect and swap.

Replace 'The [artist]' with '[artist], The' will take something like The Beetles and set as Beetles, The. Easier for searching artists.

Each Track Genre The Same corrects inconsistent Genres across tracks, to the main Genre.

Detect Multi artists from '&', 'ft.' & 'feat.' meta data providers such as freedb and MusicBrainz there is no multiple artist stored, it is up to the user who in many occasions will type Main Artist (ft. Contributing Artist). Click [edit] to list all the words used to detect multiple artists.

GD3 Remove 'Artist /' from Titles corrects titles where the artist name is in the title.

Character / Word Replacement allows words or single characters to be replaced (by other words or characters)

Store Scanned Art as PNG if scanning artwork with a scanner, this will force PNG to be saved in the ID Tags, ensure your player is able to handle such.


Write ID Tags


Individual Tags can be enabled or disabled.

Note the tag would only be written if it exists in the metadata.


Custom and Fixed Value Tags


If ripping discs and would like the same tag to be set to the same value always then it can be set which overrides the metadata from disc / internet.

Another use is if want to always edit a unique tag, you could add it here and set it to EDITME, then it would already be added to the disc, making easier editing on the Tag


File Name Restricted Characters


Sets the prohibition of characters which cannot be used in filenames, by default characters which the system cannot have in the filename are substituted for similar. It is also possible to remove characters totally (such as spaces).


When Ripping


Allows the whole CD of tracks to only be released once it is ripped, by default they are ripped to .tmp then renamed on completion, useful if adding to a player such as iTunes, so the application does not move the tracks whilst they are being worked on.


CD ROM


Lists settings CD drive specific, yellow background items are not effected by profiles, every other setting is and can be stored with a profile. After Rip disc ejection settings, it is possible to configure eject to happen only if the rip is secure.

Spin-up Time is useful for older CD drives which do not extract audio correctly until they are at speed.

Spin-down After sets how much time the drive will continue to spin after ripping has finished.

Sample Offset is used by AccurateRip, every drive has a consistent sample offset (except a small number excluded from AccurateRip). When the correct offset is set, rips irrespective of drive, will match.

Read into Lead-in or Lead-out also called over-reading if supported by the drive (most drives do not support this, leave unchecked if not 100% sure, as it can stop rips) can be used to extract the few samples that would otherwise be lost, normally at the end of last track, these samples are usually silence.

Communication offers SCSI Pass Through, ASPI and Windows Internal. For Windows a limited access user account Windows Internal has to be used, advanced secure options such as C2 pointers will not be available. SCSI is the best choice as it interfaces directly with the CD drive.

HTOA is an acronym for hidden track one audio (hidden first track), some CD discs have a hidden first track. CD Ripper will inform of HTOA and allow this hidden track to be ripped. By default hidden tracks are shown unchecked, check to Rip. There is never any meta data for this hidden track and the ability to rip depends on CD drive. www.daefeatures.co.uk lists drives which can rip HTOA.

Apply De-emphasis allows CD ripper to automatically detect CDs with pre-emphasis and automatically apply De-emphasis. Note CD Ripper detects through the TOC, there are a handful of discs which incorrectly do not have Pre-emphasis set in the TOC.


Secure Ripping Options

Access secure ripping configuration with Options, select Secure Ripping and click Secure Settings:

Pass 2 Limit Drive Speed on certain drives reading at a different speed is able to detect more errors, Pass 2 not done if c2 error pointers are enabled.

Ultra Secure extends the normal 2 pass reading with a programmable number of passes, this can help detect errors or verify the single c2 pass is error free. Depending upon your drive:
  • Drive Supports c2 error pointers well enable Ultra Secure with Minimum 1, Maximum 2 and End after 1.
  • Drive Supports c2, but badly enable Ultra Secure with Minimum 2, Maximum 4 and End after 2.
  • Drive does not support c2 enable Ultra Secure with Minimum 3, Maximum 6 and End after 2, ripping will be slower but more secure.
Individual Bad Frames is the process of re-ripping identified error frames, by ripping multiple times it is possible to recover many errors. Maximum Re-Reads is important, if your drive supports c2 pointers well and for maximum recovery set to a high number such as 700. Without good c2 support (or no c2) 50 has to be the maximum (otherwise the chance of getting matching errors is high).

Drive Read Cache is important in making sure that previous ripped audio is not given out again on a re-rip of the same frame. Pressing Detect can test for a drive cache (detection for USB drives is inaccurate), we cannot stress enough that using the default 1024 KB is a good way to ensure your drive is not caching.

Clear Read Cache with FUA certain Plextor drives can quickly remove the cached audio using a command called FUA, if supported a previously detected Drive Read Cache should show 0 KB re-running Detect with FUA checked.

C2 Error Pointers for Error Detection an important and useful aspect of secure ripping, detection is 100% accurate if a badly scratched CD is used for detection. A further option to limit datatransfer to 8KB is useful if using USB and C2 pointers were not previously working.


Secure Rip Abort

Ripping will be aborted (on that track) if any of these conditions are met:

After Unrecoverable Frames aborts ripping if the track is insecure (for one or more unrecoverable frames).

When Have to Re-Rip can abort if the track is too damaged (lots of frames to re-rip indicates a badly damaged CD).

After Ripping a Track For sets a time limit on ripping.


Interpolate removes possible clicks by not using audio returned for bad sections, most drives implement self interpolation, so is not required.

By Mark Track As Error if Insecure it is possible to use a DSP effect Delete Destination File on Error to remove any insecure ripped files. It is also to mark tracks which have not passed an AccurateRip verification as error.

Cancel Disc Ripping After Any Insecure Track makes it possible to cancel ripping the whole disc after any tracks are insecure.

Secure Extraction Log writes a ripping report to a text file, complete will be most detailed including frame re-rip details. The log can also be added to the information log which is shown on screen after ripping.


Track Menu

Right click the mouse over any track, displays:

    Rip this Track Only quickly rips a single track, or Rip Selected as indicated by blue bar, not check mark.

After ripping options to re-rip will be present if there were insecure tracks, or if the CRC calculated for each track was different on a re-rip, sure sign one of the rips had an error.

Swap Artist and Track Titles can be selected if Compilation is checked and is designed for freedb originated meta data, sometimes these two items are swapped incorrectly.

Detect Artists from Track Titles can be useful if all the tracks have Artist - Title and the artist field is blank, this option will remove the artist value to the title.

Apply Track Number Offset is useful when ripping multi-CD sets and the 2nd disc needs to start where the last one left off. It is possible to apply an offset, then another offset to get the number desired.

Copy Track Listing to Clipboard exports the track listing in text form, so it can be pasted into programs such as Notepad.

Paste Track Titles from Clipboard reads the titles, the layout should be a list of artist - title or just title.


Cue Sheet Ripping

A guide to ripping with dBpoweramp and Cue Sheets.


Profiles & Multi Drive Ripping

Profiles can store all customizable settings such as secure mode, compression choice and settings, etc.

Select [Create Profile] to create a new profile and [Delete Profile] removes the current active profile.


Whilst [ Batch Ripper ] is better for ripping with multiple drives, it is possible to run multiple CD Ripper applications, each one would need a different profile selected if changing settings between rippers.


Back To CD Ripper Main Help